Working with the “Monitor” Window, Shot Insertion
on the Timeline, Working with a Timeline, Tools Panel
 Content of the lesson:
- Controls
- Resource medium display in the left window of a monitor, its playback
- Choosing a required place in a medium, different searching possibilities, step-by-step operation
- Marking a section of a medium, inserting on a timeline (rough cut)
- Timeline playback possibilities in the right monitor window
- Working with a timeline, media block transfer, segment shortening and lengthening
- Timeline tools panel – other editing possibilities
Controls
Outline of the controls of the “monitor” window.
- Play/Stop – starting/stopping playback of the source medium
- Step Back – shifts one image back
- Step Forward – shifts one image forward
- Set In Point – set the start point of edited segment
- Set Out Point – set the end point of edited segment
- Go to In Point – jump to the starting point of the edited segment
- Go to Out Point – jump to the end-point of the edited segment
- Play In to Out – playback of the edited segment
- Insert – inserting a chosen segment on the timeline
- Overlay – inserting a chosen segment onto the timeline
- Set Unnumbered Marker – inserting a mark
- Go to Previous Marker – jump to the previous mark
- Go to Next Marker – jump to the following mark
- Loop – loop the segment
- Safe Margins – displaying a special grid; it marks a safe distance from the margin for subtitles or a video itself
- Output – preset settings for the “Monitor” window
- Shuttle – scroll bar; it is used to rewind a video forward and back
- Jog – caster; it is used for frame-by-frame jogging of a video forward and back
Resource Medium Display (video, audio, image) in the Left Window of a Monitor, Its Playback
Resource medium display
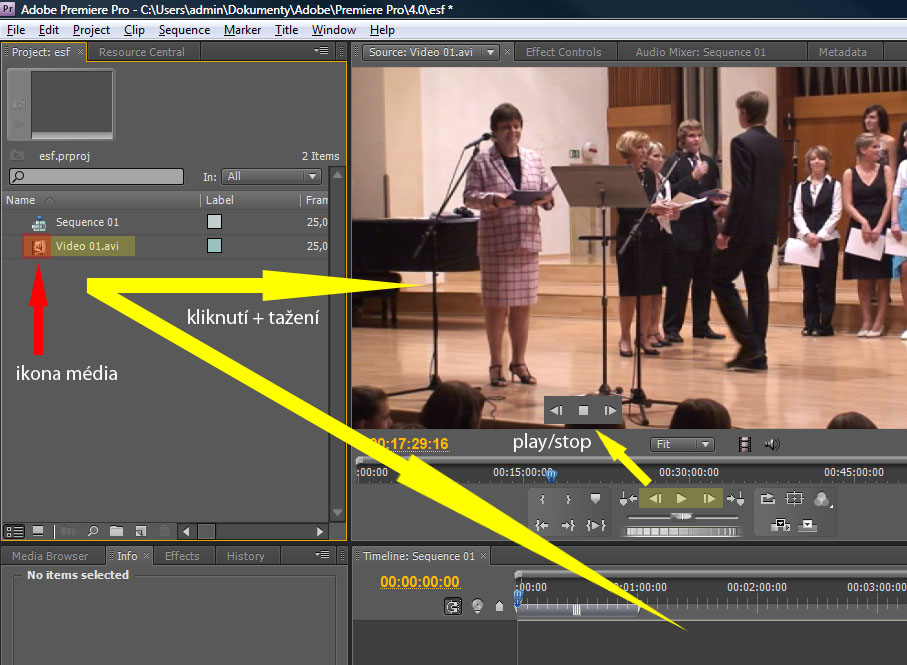
The displaying is made by a double click on the media icon (do not click on the text because you would edit it) or by clicking on the icon/text (title) of the medium (keep the button pressed after clicking on it) + drag it into the left monitor window or directly onto the timeline. Then release the button.
Resource medium playback
To playback the “play” button is used (if we run playback, the “play” button changes to “stop” button).

Resource medium display and playback
Choosing a Required Place in a Medium, Different Searching Possibilities, Step-by-step Operation
Choosing a place where we want to edit the material can be done using several ways:
- By moving a scroll bar or by clicking on a concrete place – after dragging the scroll bar (by clicking left mouse button and keeping it pressed) and moving it to the left or right we can move to any place on the timeline of the left “monitor” window and watch where we are in the medium at the same time (each change is displayed by changing shots while moving). Another possibility is clicking on any place on the timeline; the scroll bar moves to this place automatically and in the left “monitor” window it displays the current shot accordant with the place in the clip at the same time.
- Slide – we can deflect the slide by clicking the left mouse button, keeping it pressed, and moving it to the left or right. The slide gets back to its original position after releasing the button. If the slide is slightly moved to any side, the clip starts moving slowly shot by shot in the given direction in the left “monitor” window. The more the slide is deflected the faster the clip is playback. If the slide is deflected to its peak position, the clip is rewind quickly.
- Caster – we can turn the caster by clicking the left mouse button, keeping it pressed, and moving it to the left or right. The clip is then moved according to the pace of the movement of the mouse. The caster is used for fine searching of a place in a clip.
- • Setting a concrete time or shifting the time by moving the mouse to the left or right using the time indicator – when we move the mouse onto the time indicator in the left part of the “monitor” window a hand symbol with left and right arrows appears. By clicking the left button, keeping it pressed, and moving the mouse to the left or right, we move the time back or forward. If we just click the mouse button on the time indicator and release it, we edit the given time. We can write down the precise time and when we press the Enter key to confirm it, the clip moves onto the given time.
- • Stepping (Single-shot operation) – using the “Step Back” and “Step Forward” buttons we move the source video by 1 image forward or 1 image back.


Marking a Ssection of a Medium, Inserting on the Timeline (rough cut)
If you have chosen the beginning of a segment (the scroll bar is on the intended place, we can see preview in the window), press the button with the left bracket. Then move the mouse pointer onto the end of the chosen segment and click on the right bracket symbol. By doing this you have chosen the segment we want to insert on the timeline. Now insert this segment by pressing the insert button or overlay button. If you want to make some modifications before inserting the segment, you can resize it. After moving the mouse to one or another end of the segment, a symbol of a red angular bracket with small left and right arrows is displayed. The change is made by clicking (keep the button pressed) and moving the end. Or you can find any place in the clip using the previous way and use the brackets symbols for inserting again. Finer edition is made on the timeline.

A chosen video segment
- Insert – inserting a chosen segment onto a timeline (the chosen segment is inserted in the place of the cursor and the rest of the previous video continues after the new inserted segment, the original video is divided into two parts and the new video is inserted between these two parts).
- Overlay – inserting of a chosen segment onto a timeline (the video is re-written by the new inserted video in its length from the cursor onward).
Timeline Playback Possibilities in the Right Monitor Window
The possibilities here are almost the same as in the left window.
Differences
- Go to Previous Edit Point – a jump to the previous edit point of the video segment
- Go to Next Edit Point – a jump to the next edit point of the video segment
- Lift – removing a chosen part of a video segment, leaving a blank interval
- Extract – removing a chosen part of a video segment, filling the blank interval by moving the rest of the segments
- Trim Monitor – a special window for editing of video segments
Working with the Timeline, Media Block Transfer, Segment Shortening and Extending
The basic purpose of the timeline is a space for inserting of the cut parts from the resource media in the form of segments, their ordering and fine-tuning of a rough cutting.
Further information assumes that the user has chosen “Selection Tool” on the timeline tool panel.
Removing media segments
It is possible to move individual segments on a timeline arbitrarily. It is enough to click the left mouse button (keep it pressed) and move it to the left or right. The segment can also be moved into another track (for example, into Video 2 or Video 3, audio part stays the same in the track during this movement). The audio track can be moved in the same way conversely. We can see binded audio and video tracks in the picture. If we want to break up this structure and move each part individually, we click on this connection by the right mouse button and choose “Unlink” from the context menu. Each part will be independent from that point.

Transfer
If the “Snap” function is on, the moved segment is attached when being in a tight contact with another segment.

Transfer with a magnetic tack
If we want to remove some blank interval on a timeline, we click the right mouse button on this interval. The “Ripple Delete” button is displayed and by clicking on it the interval is deleted.

Deleting a space
Shortening and Extending Media Segments
If we move the mouse on to the beginning or end of a segment (red brackets with small left and right arrows are displayed) and then click the left mouse button (keep it pressed), we can change the length of this segment by moving the mouse to the left or right.

Extension of a segment
When the “Snap” function is on, the extended segment is attached during a tight contact with the next segment (a black line is displayed).

Extending a segment with a magnetic tack
The “Snap” function can be also used for finer edition. Move the red cursor on a timeline onto a concrete place (in the left “Monitor” window an intended shot is displayed) and by changing the length of this segment towards this cursor the shortening segment is attached and the exact end or beginning is set. On the other hand, if we want to extend a segment in this way, we extend it first roughly and than using the mentioned way we make it shorter.

Extending a segment with a magnetic tack
Timeline Tools Panel – Other Editing Possibilities
This panel extends possibilities of editing segments inserted on the timeline.

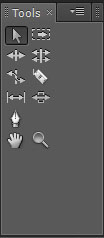
- Selection Tool – a tool for selection
- Track Select Tool – a tool to mark all following segments onward from the given place
- Ripple Edit Tool – – a tool for shortening and extending video segments with rolling in and out the other segments (there are no blank places)
- Rolling Edit Tool – a tool for shortening and extending video segments; the following video is shortened or extended in the same section as the trimmed one
- Rate Stretch Tool – a tool for shortening or extending video segments by speeding up or slowing down the speed of time
- Razor Tool – a tool for further editing of video segments placed on a timeline
- Slip Tool – a tool which is used to move a video segment forward or back while keeping its length the same
- Slide Tool – a tool which is used to move the chosen video segment while the surrounding segments are made shorter or longer
- Pen Tool – a tool to set or choose key shots, so called “keyframes” or to modify connection links between them
- Zoom Tool – a tool for zooming in a timeline (with ALT kept pressed it works vice versa)
- Hand Tool – a tool for moving the timeline
Questions
- How can you display the source medium in the left window "monitor"?
- Which possibilities of searching a particular place inside a medium do you have?
- How can you set the part of video which should be cut out and how can you insert it to the timeline?
- What is the difference between the right "monitor" window and the left one?
- How can you move blocks of media on the timeline?
- How can you shorten or expand blocks of media on the timeline?
- What does the tools panel offer?


